How To Do Canon MG3600 Setup?

If you have recently purchased a Canon PIXMA MG3600 printing machine for your home or office use, then the first thing you require to do is to unpack the box slightly and take out all the accessories and then put the device on a table. Plug-in the printer in an electric power slot and then start with the canon mg3600 setup.
Begin with connecting all its wires by looking in the printer manual. With an automatic connection button, WPS, you can connect your devices. This allows both the devices such as printer and computer to connect with each other to your network without needing to enter a password.
It also enables a quick and easy method of connecting your devices. By using the Canon Support service you can take assistance as the qualified and extra-talented tech-geeks work here.

Methods For PIXMA Canon MG3600 Setup
Method 1: WPS Connection of Method
If your access point has a WPS button, then without any confusion select the ‘WPS Connection Method’ as this method is the easiest way of completing canon mg3600 connection setup with Wi-Fi. Just have a glance on the noted lines and follow the same as directed:
- First of all, make sure that the printer is ON and the WPS button on the wireless router is accessible
- Now, press and hold the Wi-Fi button on the printer until the ON lamp flashes
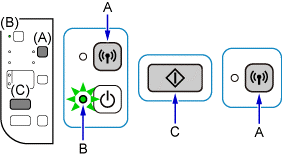
- Press the “Black” button and then the “Wi-Fi” button
- Now, make sure the Wi-Fi lamp flashes quickly and the ON lamp is lit. Then, go to your access point and press the WPS button within a couple of minutes
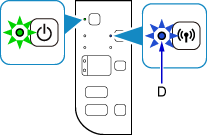
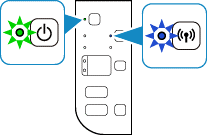
- After that, you can see that the blue Wi-Fi lamp on the printer will continue flashing while searching, and the Power and Wi-Fi lamps will both flash when connecting to the access point. Once the printer gets successfully made the connection to your wireless network, the Power and Wi-Fi lamps will stop flashing and remain lit
- In the end, make sure that the Wi-Fi lamp and the ON lamp are lit
Once done the above procedure, the network connection setup is now completed. If still your device is not connected, then jump to the next method to complete the canon mg3600 setup process.
Method 2: Standard Connection Method
In case your access point doesn’t support WPS feature, then follow the below-given instructions to set your printer up on your wireless network:
- Click on “Start Setup” when the initial screen display
- Now, the software will check for the driver if there is needed to update. It will start downloading automatically if needs to be updated. Wait for a few minutes
- Select your region and country and then click “Next”
- If you accept the terms and conditions of the license agreement, then click “Yes”
- If you want to take part in the Extended Survey Program, click “Agree”, otherwise click “Do not agree”
- Click “Next” to allow all “Install Wizard Process”
- Select “Wireless LAN Connection” and then tap “Next”
- Select Connect via wireless router” and then click “Next”
- Make sure your printer is turned on and then hit “Next”
- Make sure “Setting printer could not be found on the list” is selected, and then tap “Next”
- The setup guide will open, all you need to do is to follow the on-screen instructions carefully
- Wait for a minute while the setup discovers the printer
- Once the setup is completed, hit “Next”
- And then click “Exit”
Take Canon Support Help For Completing Canon MG3600 Setup
Don’t feel blue! In case you are confronting any kind of hurdles while following these above steps as we have highly experienced tech-savvy working day and night at Canon Support Number. Make a connection with them via placing a single call on this helpline number and get a one-stop solution in a handy way.
Frequently Asked Questions (FAQs)
How Do I Connect My Canon Mg3600 Printer To A New WIFI?
On your very first step, you need to press and hold the Wi-Fi button till on lamp starts blinking. Next, you need to press ‘Black’ button and then Wi-Fi button. Once done, press the WPS button from the access point within in 2 to 3 minutes. After the successful connection between Canon Mg3600 printer and Wi-Fi, both lamps (the Power and Wi-Fi) will stop flashing. Doing so will surely help you to do what you are looking for, in an efficient manner.
How Do You Connect A Canon Printer To WIFI?
- For that, you need to confirm that your canon printer is in the active mode.
- On the top of the printer, a Wi-Fi button appears, just press and hold it for a few seconds.
- In a couple of seconds, you will see an alarm lamp flashes for a single time.
- Reach out to your access point once it starts flashing blue
- Then, press the WPS button and the blue lamp will start flashing continuously.
- Once it completes the search, your printer connects to the wireless network successfully.
How Do I Reset My Canon Mg3600 Printer?
- First, press and hold the Wi-Fi button that you can find on the HP mg3600 printer
- Wait till you come to see a lamp flashes for once.
- If the lamp starts flashing continuously, press the ‘Black’ button and Wi-Fi button.
- You should now, press and hold the button available on the wireless router.
Doing so will surely help you to reset your HP mg3600 printer in an efficient manner. Moreover, you can refer to the pro-guide which you can get from the online sources if you need more information.
How Do I Hook Up My Canon Printer To My Laptop?
- Firstly, make sure you have turned off Canon printer.
- Connect the Canon printer and your laptop safely using a USB cable.
- Next, you should turn on the printer.
- Reach out to your PC and go to the ‘Control Panel’.
- Opt for the ‘Devices and Printers’ option.
- Go to ‘Add a Printer’
- Choose the ‘Local Printer’
- Now, you need to give a name to your printer and then click ‘Next’.
- Choose if you want to make use of your printer as a default printer
- Click the ‘Finish’ option to complete the process successfully.
How Do I Install A Canon Printer Driver?
- Simply pick the install CD that came with the printer package
- Put the installation disc into the DVD drive of your computer system.
- Double-click on the CD drive to proceed further.
- You need to click on the ‘Setup’ option.
- Here, you need to download and run the drivers.
- Now, in the installation wizard, you need to follow the on-screen instruction
The above-mentioned steps will make sure that you will be able to install the Canon printer drivers successfully.
What Is The WPS Button?
WPS Button refers to the Wi-Fi Protected Setup button available on the both printer and router. It is mainly available to simplify the connection between the printer and router in a hassle free manner. It works on only wireless networks and establishes the connection faster and easier too. Moreover, you can also make use the WPS button for various other activities pertaining to wireless network and many more. Besides, you should make use of the expert’s supervision and guidance if you are seeking more information.
What Happens When I Press The WPS Button On My Router?
The WPS button on the router is available with a single objective to simplify the entire connection process. When you press the WPS button located on your router, it will automatically start finding the new devices. After that, you need to navigate to the device and choose the network you are looking forward to connecting with. Here, you don’t need to enter the network password as your device will promptly connect to the wireless network
Why Should You Use WPS?
WPS stands for Wi-Fi Protected Setup, allows a secured connection between a router and a wireless printer. Besides, it configures the WPA key along with the SSID and connects the WPS-enabled devices without using SSID and security key. Moreover, you can easily set up the connecting by making use of WPS pin or WPS button. If you don’t have the knowledge to use WPS, you can also fetch the proper assistance from the professionals anytime.
Why Is My Wi-Fi Not Working?
There can numerous numbers of reasons behind the Wi-Fi not working problems. You should basically restart your computer system and modem to try fixing such hurdles. If the issue is still occurring, you should check the setting because your windows sometimes disable the Wi-Fi service. Moreover, you can also consider changing the frequency and channel of your Wi-Fi to resolve such kind of obstacles. If you are facing the failure while resolving it, you should opt for the expert’s backing for the correct resolution.
